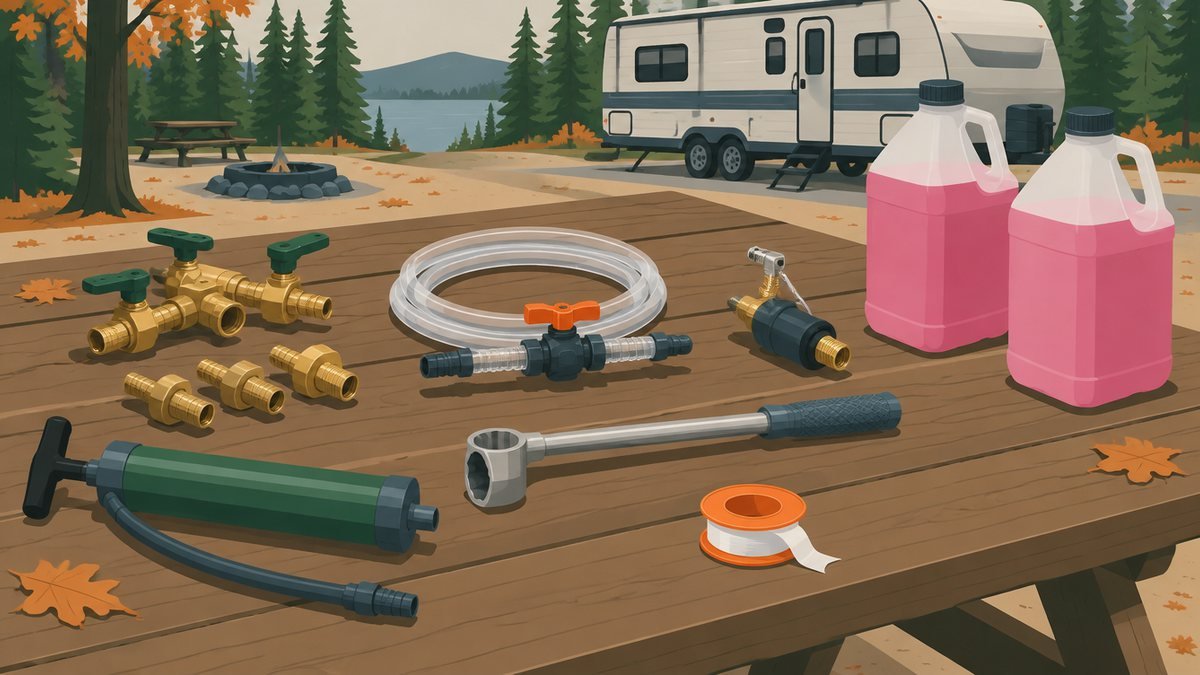
An RV winterizing kit is a small set of valves, hoses and adapters that turns winterizing from a messy, improvised job into a quick routine. With the right parts installed, you can pump antifreeze straight from the jug into your lines, skip the water heater entirely, or blow the lines out with compressed air, all without crawling under the rig with a pile of loose fittings.
This guide explains what typically comes in a winterization kit for RV plumbing, what each part does, how it installs, and how to decide which pieces your RV actually needs.
What an RV winterizing kit does
Winterizing has two goals: get the water out, and protect what’s left with RV antifreeze or air. A kit makes the second part easier in three ways:
- It lets you draw antifreeze directly from a jug into the water pump, instead of pouring it into the fresh tank.
- It lets you bypass the water heater, so you don’t waste gallons of antifreeze filling the tank.
- It gives you a way to connect an air compressor to the city water inlet if you prefer to blow out the lines.
Many newer RVs come with some of these parts already installed by the manufacturer. Before buying anything, look behind the water heater access panel and near the water pump to see what you already have.
What’s in a typical RV winterization kit
Kits are sold in different combinations, and you can also buy each part separately. These are the common components.
Pump converter (siphon) kit
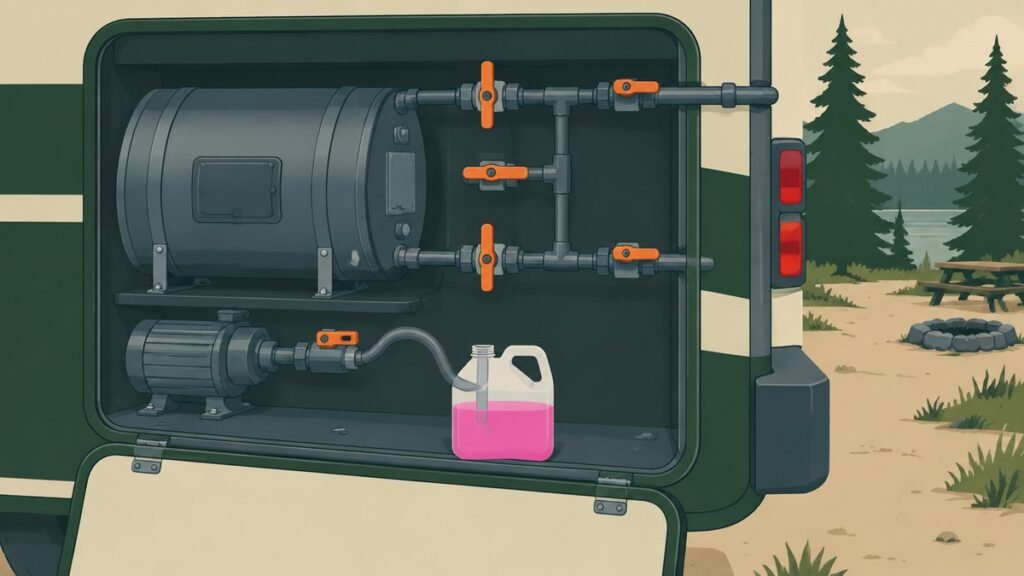
A pump converter is a tee fitting with a valve and a short suction hose that installs on the inlet side of your 12-volt water pump. In normal use, the valve is closed and the pump draws from the fresh tank. To winterize, you open the valve, drop the hose into a jug of antifreeze, and the pump pulls antifreeze straight into the lines.
Water heater bypass kit
A bypass kit is a set of valves (often three, sometimes a single combination valve) installed on the hot and cold lines at the back of the water heater. Turning the valves isolates the tank and connects the cold line directly to the hot line, so antifreeze travels through the house plumbing without filling the heater.
Blow-out plug or air adapter
This is a small adapter that threads onto the city water inlet and has a fitting for an air compressor hose. It’s the key part if you plan to winterize your RV with an air compressor instead of, or in addition to, antifreeze.
Hand pump
Some kits include a simple hand pump that connects to the city water inlet and pushes antifreeze from a jug into the lines. It’s a backup if you don’t want to install a pump converter, or if your water pump isn’t working.
Small tools and spares
Depending on the kit, you might also get thread seal tape, a socket for the water heater drain plug or anode rod, a spare drain plug, or replacement washers. These are inexpensive but save a trip to the store when a part is stuck or worn.
Do you need every part?
Not necessarily. Here’s how to decide:
- Already have a bypass? Most modern RVs do. If yours has valves behind the water heater, you only need the pump converter.
- Using compressed air only? The blow-out plug is the main part you need, plus a bypass so you can drain and isolate the water heater.
- Older RV with no factory parts? A complete winterize kit for RV use covers both the bypass and the pump converter in one purchase.
- Not comfortable installing fittings? A hand pump with the city water inlet is the least invasive option.
Whatever you buy, check that the fittings match your plumbing. RVs use several connection types, and a kit that fits one water heater or pump may need adapters for another.
How to install a pump converter
Installation details vary by pump, but the general process is:
- Turn off the water pump and disconnect power to it, then relieve pressure by opening a faucet.
- Locate the inlet side of the pump; there’s usually a strainer or filter just ahead of it.
- Disconnect the inlet line, install the converter tee, and reconnect the line to the tee.
- Seal threaded joints with thread seal tape where appropriate, and don’t over-tighten plastic fittings.
- Close the converter valve, restore power, run the pump and check for leaks.
If your pump is in a tight spot or the fittings don’t match, a qualified RV technician can add the converter during routine service.
How to install a water heater bypass kit
Only work on the water heater when it’s off at both the propane and electric controls, completely cool and depressurized.
- Shut off water, open a hot faucet to relieve pressure, and drain the tank.
- Access the hot and cold connections at the back of the heater, usually from inside the RV.
- Remove the existing connections and install the bypass valves following the kit’s diagram.
- Reconnect the lines, set the valves to the normal position, refill the tank with a hot faucet open to purge air, and check every joint for leaks before turning the heater back on.
Mistakes here can leave the heater running empty or leaking inside a cabinet, so if you’re not confident with plumbing, have it installed professionally.
How to use your kit to winterize
With the parts in place, winterizing goes like this. For the complete process, see our guide on how to winterize an RV.
- Drain the fresh tank, low-point drains and water heater; remove filter cartridges.
- Set the bypass valves to bypass the water heater, reinstall plugs and close the drains.
- Open the pump converter valve and put the suction hose in a jug of RV winterizing antifreeze.
- Run the pump and open each fixture, cold then hot, until antifreeze appears.
- Flush the toilet until antifreeze shows in the bowl, and pour antifreeze into each drain.
- Close the converter valve and switch off the pump.
If you prefer air, connect the blow-out plug to the city water inlet and work through each fixture. Our comparison of compressed air vs antifreeze explains the pros, cons and safe pressure practices.
Choosing RV winterizing fluid
Only use antifreeze labeled for RV and marine potable water systems. It’s usually pink and based on propylene glycol, and jugs typically list a burst protection temperature. Never use automotive antifreeze, which is toxic. How much you need depends on your RV’s plumbing; buy a few gallons and keep a spare jug, especially for larger rigs or RVs with a washer, dishwasher or second bathroom.
Maintaining your winterizing kit
- Before each season, open and close every bypass and converter valve to make sure they move freely.
- Check that the converter valve is fully closed before you use the fresh tank again, or the pump may suck air.
- Inspect hoses for cracks and replace worn washers.
- Store the blow-out plug and hand pump together with your antifreeze so everything is ready next fall.
Frequently asked questions
Is an RV winterizing kit worth it?
For most owners, yes. A pump converter and bypass make winterizing faster, use less antifreeze, and avoid filling your fresh tank or water heater with antifreeze that has to be flushed out in spring.
Can I install a winterizing kit myself?
Many owners do, especially the pump converter. The water heater bypass involves more plumbing work. If you’re unsure about fittings or working near the water heater, have a technician install it.
Do I still need antifreeze if I blow out the lines?
Many owners also add RV antifreeze to the P-traps and toilet after blowing out the lines, since air can’t protect water sitting in drains. Whether to put antifreeze in the supply lines too is a personal choice; some owners do both for extra protection.
Will a winterizing kit fit my RV?
Most are designed for common RV plumbing, but connection types vary. Check your water pump’s inlet fitting and your water heater’s connections, and confirm the kit’s compatibility before buying.
Sources
Always check the manual for your exact model. These manufacturers and public agencies are good places to confirm the details that apply to your equipment.