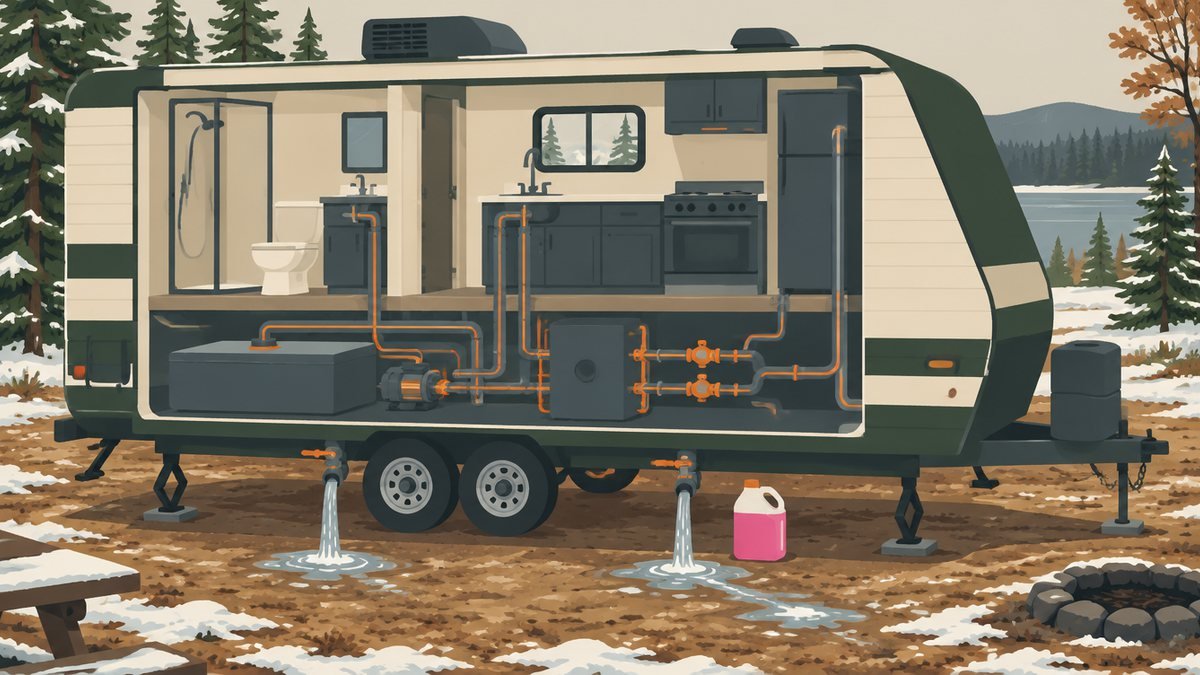
If you live anywhere that sees a hard freeze, knowing how to winterize an RV is one of the most valuable maintenance skills you can have. Water left in your lines, pump, water heater or fixtures expands as it freezes, and that expansion can split fittings and crack valves in places that are hard to reach and expensive to fix. The good news is that winterizing is a methodical job most owners can do in an afternoon with basic tools and a few gallons of RV antifreeze.
This guide walks through the full process step by step: draining, bypassing the water heater, pumping antifreeze through the system, and protecting the drains and holding tanks. It also covers what to do in spring when it’s time to de-winterize your RV.
Why you need to winterize your RV
An RV’s plumbing runs through cabinets, under floors and along exterior walls. Unlike a house, most of those spaces are not heated when the RV is in storage, and many lines run close to the underbelly. Even a short cold snap can freeze water trapped in low spots.
Freeze damage tends to show up in a few predictable places:
- Faucet valves and shower mixers, which hold small pockets of water.
- The water pump head and its check valve.
- The toilet valve, which holds water in the bowl seal.
- The water heater tank and its fittings.
- Low points in PEX lines and plastic fittings in the underbelly.
- Outside showers, ice makers and washing machines, if your RV has them.
Winterizing removes as much water as possible and replaces what’s left in the lines and traps with a freeze-resistant fluid. Some owners prefer to blow the lines out with compressed air instead of using antifreeze; we compare the two in Winterizing an RV with Compressed Air vs Antifreeze.
What you need before you start
You don’t need much, but having everything on hand keeps the job moving:
- RV antifreeze. Use only non-toxic RV and marine antifreeze, usually pink and based on propylene glycol. Never use automotive antifreeze in a fresh water system. How much you need depends on the size of your plumbing; buy a few gallons and keep an extra jug on hand for larger rigs, extra bathrooms or a washing machine.
- A water heater bypass. Most modern RVs have one built in. If yours doesn’t, a bypass kit can be installed.
- A way to get antifreeze into the lines. Either a pump converter (a short hose and valve on the inlet side of your water pump) or a hand pump connected to the city water inlet.
- Tools. A socket or wrench that fits your water heater drain plug or anode rod, thread seal tape, a flashlight, gloves and a bucket.
If you’re putting together supplies for the first time, our guide to the RV winterizing kit explains what each piece does and how to install it.
How to winterize an RV, step by step
Every RV is plumbed a little differently, so keep your owner’s manual handy. The sequence below is the standard approach for most travel trailers, fifth wheels and motorhomes.
Step 1: Turn off the water heater and let it cool
Switch off the water heater at both the propane and electric controls. Never drain a water heater while it is hot or under pressure: the water can scald you. Give it several hours to cool, then open the pressure relief valve on the outside panel to release pressure.
Step 2: Disconnect water and dump the holding tanks
Disconnect the city water hose. Dump and flush the black and gray tanks at a dump station, and remove any inline water filter cartridges. Filters can be damaged by antifreeze and would also absorb a lot of it.
Step 3: Drain the fresh water system
Open the fresh tank drain and the low-point drains, which are usually under the RV near the lowest part of the plumbing. Open every faucet, hot and cold, plus the outside shower, to let air in so the lines drain fully. Briefly run the water pump to push out the last of the water, then switch it off; don’t let it run dry for long.
Step 4: Drain the water heater
Remove the drain plug or anode rod from the water heater (on many models it’s the large fitting at the bottom of the outside panel). Let the tank empty completely. This is also a good moment to inspect the anode rod if your heater uses one.
Step 5: Bypass the water heater
Set the bypass valves so water and antifreeze skip the tank. Filling a water heater with antifreeze wastes several gallons and isn’t necessary once the tank is drained. Reinstall the drain plug or anode, then close the low-point drains and all faucets.
Step 6: Pump antifreeze into the lines
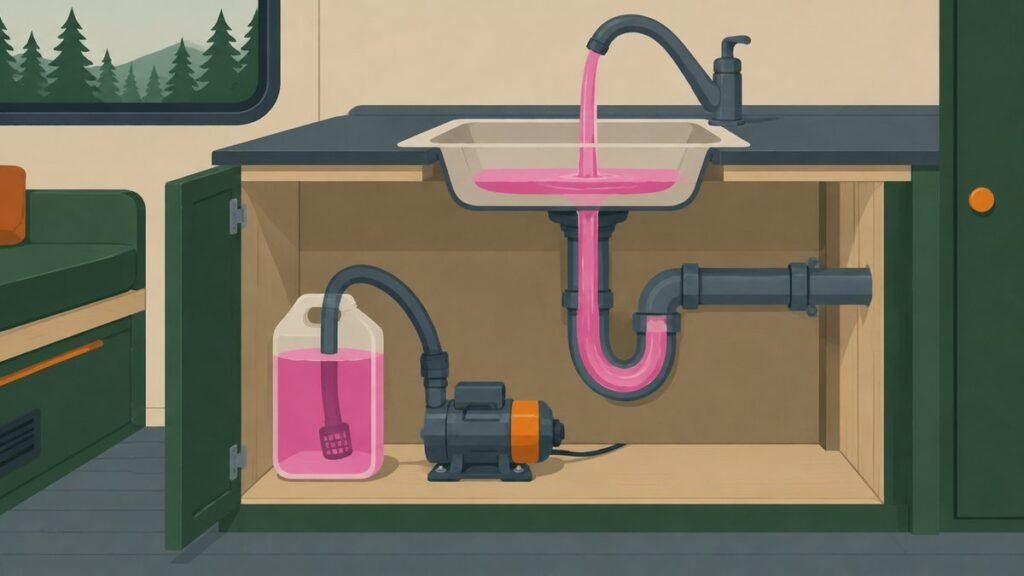
Using a pump converter, put the suction hose into a jug of RV antifreeze, open the converter valve and turn on the water pump. With a hand pump, connect it to the city water inlet instead. The system will pressurize once antifreeze fills the lines.
Step 7: Open each fixture until antifreeze appears
Starting with the fixture closest to the pump and working to the farthest, open the cold side, then the hot side, until pink antifreeze flows steadily. Don’t forget:
- Kitchen and bathroom faucets, and the shower.
- The outside shower or exterior wash station.
- The toilet: flush until antifreeze appears in the bowl.
- Ice makers, washing machines and dishwashers, following each appliance manufacturer’s winterizing instructions.
Swap jugs as needed so the pump never draws air for long.
Step 8: Protect the drains and traps
Pour a cup or so of antifreeze into each sink and shower drain to protect the P-traps, and add some to the toilet so the seal stays covered. A little in each holding tank also helps protect the termination valves.
Step 9: Shut everything down
Turn off the water pump, release pressure by opening a faucet briefly, and close it again. Turn off the main battery disconnect if you’re storing the RV, and make a note on the city water inlet or dash that the system is winterized so nobody hooks up a hose by mistake.
RV winterizing checklist
Use this as a quick reference once you know the routine:
- Water heater off, cooled and pressure relieved.
- Holding tanks dumped and flushed.
- Water filter cartridges removed.
- Fresh tank, low-point drains and water heater drained.
- Water heater bypassed, plugs reinstalled, drains closed.
- Antifreeze pumped to every fixture, hot and cold.
- Toilet, outside shower and appliances done.
- Antifreeze in every P-trap and a little in each tank.
- Pump off, pressure released, batteries disconnected.
Extra cold-weather precautions
Winterizing the plumbing is the main job, but a few other tasks protect your rig while it’s stored:
- Propane. Close the valves on your propane tanks. If you remove portable cylinders, store them outdoors upright and away from ignition sources, never inside a garage or living space.
- Batteries. A discharged battery can freeze. Keep batteries charged or remove them and store them per the manufacturer’s guidance.
- Pests and moisture. Empty the refrigerator, prop the doors open, and seal obvious gaps where rodents could get in.
- Roof and seals. Check roof sealant before winter. Only go up on the roof if it’s rated for walking, the surface is dry, and you have someone with you.
How to de-winterize an RV in spring
When freezing weather is behind you, reverse the process:
- Return the pump converter to normal and the water heater valves to the normal (non-bypass) position.
- Connect fresh water and run each faucet until the water runs clear with no pink tint.
- Fill the water heater completely, with a hot faucet open to purge air, before turning on the propane or electric element. Firing an empty water heater can damage it.
- Reinstall water filter cartridges.
- Sanitize the fresh water system before drinking from it.
Frequently asked questions
When should I winterize my RV?
Winterize before the first hard freeze in your area, not after. If you’re still camping in shoulder season, you can keep using the RV and simply watch the forecast; once overnight lows are expected below freezing for long enough to freeze exposed lines, it’s time.
Can I just drain the lines without antifreeze?
Draining removes most of the water, but some always stays in low spots, valves and the pump. That’s why owners either follow up with antifreeze or blow the lines out with compressed air. Draining alone is a risk in a real freeze.
Does RV antifreeze go in the fresh water tank?
Generally no. The fresh tank is drained, not filled with antifreeze. Some RV plumbing setups draw antifreeze from the tank, but most owners use a pump converter or hand pump so they don’t have to flush antifreeze out of the tank in spring. Check your manual.
Is RV antifreeze safe?
RV antifreeze is designed for potable water systems and is far less toxic than automotive antifreeze, but you still shouldn’t drink it. Flush the system thoroughly when you de-winterize, and keep jugs away from children and pets.
Sources
Always check the manual for your exact model. These manufacturers and public agencies are good places to confirm the details that apply to your equipment.